Marina
My persistence paid off
- Ever since I was knee high to a grasshopper, we have had a Leyland in the family, by mum's choice.
- Mum was sick of seeing the bombs dad used to invest in, the XL Falcon being the icing on the cake, so she chose the next car (after selling the Falcon for $50) that shared the same name as her, a Marina!
- They purchased a 1972 4-cyl 2 - door country cream super for $1800 soon after I was born, which stuck with us for 15 years before the car was written off.
- It wasn't the fastest car on the road, but it certainly grew on me, and it was brought to my attention that the Marina came out with a 6-cyl engine.
- That made my day hearing that, so I started dreaming about the possibilities for building a Marina of my own.
- I wanted to build a 6-cyl bold as brass 2 door, with all the fruit (take into consideration that I was only 15 at the time).
- Three years of looking finally paid off when I found a 6-cyl coupe for sale in Beekenham for $400.
- At the time, it was a badly faded dry red (originally Spanish Olive), T-bar auto and was unlicensed.
- Here's a tip for one who is about completely rebuild a car- TAKE PHOTOS OF THE THING BEFORE YOU EVEN TOUCH IT!!!, because when you finish, you forget how bad the car looked when you first bought it and you fail to realise just how much effort went into building it (guess who didn't take photos?).
- While I was living with my parents, the car was stripped and sent off for panel beating, rust cutting and etch - priming (the shell was stripped to bare metal), Which set me back $2,500 in 1997. Over the summer of 97 - 98, I painted the shell "bold as brass".
- Here's another tip - while sanding back the spray putty coat, use a soft rubber block, DON'T USE YOUR FINGERS !!! Trust me.
- Your topcoat will not look as nice as you'd like it to.
- I moved out of home into the real world when I bought my first house, so you could imagine that I didn't do a thing to the car for some time.
- I managed to replace the front and rear suspension before I moved out WOOHOO!
- I could start pushing it around again, but I didn't do a thing to the car for about four years.
- In that time, I'd minimised the binge drinking (that was hard), got married and "led down (somewhat).
- I got sick of seeing this half finished shell, so I waited until my wife, started working full time before I decided to finish it off, beginning April this year.
- From here on in, I will itemise what I have done to the car, I'm hoping this will he a little easier to follow...
ENGINE
- .020"' oversize pistons
- Hardened exhaust seats and guides, to run regular or premium unleaded without the need for additives
- Continuous rubber gasket made for sump, with basic oil resistant "&'ring around front main oil seal adapter
- (original set - up is no longer available) .010" undersize big ends and.020" undersize mains
- Fuel pump replaced with blanking plate and an electric pump was fitted. 1 used a h~ clamp on the suction side
- to reduce fuel line pressure
- Oil filter adapter replaced to accommodate Z9 oil filters
COOLING SYSTEM
- Original thermo fan replaced with 7-blade thermo fan from late model Commodore.
- The Commodore blade was a little big for the marina shroud, so I fixed the blade to the motor, placed the motor in a vice, booked up a power supply and filed the outside of the blade.
- The idea behind this was to keep the blade balanced so that it wouldn't cause any unwanted vibrations in the car.
TRANSMISSION
- Borg Warner single rail 4 speed fitted from a Ford Cortina.
- The Marina only came out with a 3-speed floor shift (bit of a bummer).
- I chose the Cortina over the P76 because the shifter is located closer to the gearbox itself.
- Using the P76 would have meant that I would have had to relocate the handbrake lever (forget that!).
- P76 input shaft and bell housing was used to replace the Ford set up.
- Only a small section of the floor was cut to accommodate the Cortina shifter.
- Tail shaft was made to adapt the 4 speed to the Marina diff.
SUSPENSION
- The shock absorbers I used were not of the original spec. The part numbers for both front and rear are:-Pedders part no's GSR 9034 and GSI9063. I don't remember which pair went where, but you should be able
- to see which goes where when you look at them (yes, I bought them from Pedders).
Front
- After market telescopic shock absorber kit fitted, with Daihatsu Rocky bottle shocks
- The original shocks were re-bushed and gutted, so that they would only act as suspension arm
- All components powder coated
Rear
- Diff was disassembled and powder coated along with reaction rods and brake assembly plates
- Leaf springs were wet sprayed in 2 pack
ELECTRICAL
- Re wired from scratch, to cope with stereo and thermo fan Immobiliser and remote central locking fitted.
- Alternator connected in "delta" with external power diodes to cope with stereo and thermo fan.
- The power diodes I used are rated at 6 amps, and are available from Dick Smith Electronics.
INTERIOR
- All 6-cyl coupes were luxury pack models, with a similar trim to the P76 Executive.
- My interior is now black (was dark brown) with velour seats.
- New interior panels were made to suit the speakers (6" on front doors. 6" x 9" on the rear), and the back seat was removed to accommodate two 12" sub woofers.
- New dash panels were made and powder coated to suit the stereo unit and new switches.
- Glove box compartment was gutted to make room for the CD stacker.
- Street legal tinted windows.
TROUBLE SHOOTING
- With just about every modification done to a car, headaches will surely follow.
- I certainly wasn't spared any of them, so here a few to look out for if you wish to do the same to your Marina that I have.
ENGINE
- This was the most upsetting thing for me.
- I completely reconditioned the motor from top to tail, over size pistons, valves, ground crank, etc.
- I noticed on the road that every time I took off from stand still, I'd look at my rear view mirror and what would I see ... SMOKE! Lots of it!
- James Bond would have been envious of the smoke screen I would leave behind!
- It showed the signs of a motor that had done half a million miles, what an upset (you get the hint yet?).
- I came to the conclusion that the problem was excessive clearances on the valve guides.
- This is the same problem I'm having with another 6-cyl Leyland, so I used this other motor as a guinea pig to solve my problems.
- My dad (a motor mechanic) and I ran a few ideas past each other, looking at various valve stem seals from other vehicles, but nothing we found (in dads' garage) cut the mustard.
- Then dad mentioned that on some older vehicles, the valve stem seal was merely an "o" ring fitted around the stem, free to move with the valve.
- It sounded a bit crude at the time, but we decided to give it a go.
- We didn't have any "o" rings, however, so I made some out of oil resistant rubber (the drawing for this is at the end of the article).
- This simple addition made a huge difference.
- It reduced the amount of smoke emitted, and my valves haven't seized up yet, so I'll now do the same thing to my coupe.
GEARBOX
- I couldn't use the Marina or Cortina gearbox mount because they were both too high.
- So I packed the gearbox up with oil resistant rubber to the height I wanted (sounds rough, but it did the job), drilled out the cross member in line with the mounting holes on the extension housing and used longer bolts to fix the box to the cross member.
- Being a Ford box, I've had to use the Ford drive gear to run the Speedo, and it has thrown my Speedo readings out
FUTURE WORK
- I have plans to install a digital speedo and tacho, which should fix my gauge blues.
- I intend to enhance another 6-cyl motor as much as I can and bolt a Celica 5 speed behind it, with twin carbs and extractors.
- I also intend lowering the car 1 1/2 inches and fitting 14"' rims, as wall as giving it a final detail.
- I'll keep you posted if I succeed....
VALVE STEM SEAL ADDITION
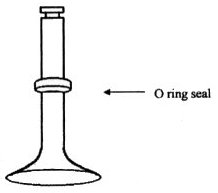 | This "o" ring works in a way that it moves up and down with the valve.
- First, you need to ensure that your valves won't fall inside the bores when you remove the valve springs and cotters.
- I used about 3 meters of soft cotton rope and stuffed it down the, bore through the spark plug hole while the piston was roughly bottom dead centre, then turned the motor over so that the rope would push the valves up holding them in position.
- When fitting the seal, press it down all the way so that it sits on the head, it will sort itself out from there on.
| THINGS TO LOOK OUT FOR
- Remember to do up the chain tensioner before you start anything.
- It would help if you did this job while the motor is cold to avoid shims and buckets falling out while removing the carrier.
- It will also help if you have someone holding up the timing chain while you're turning the motor, to avoid any damage to timing cogs.
- Remember which way number 1 cylinder faces on the distributor so that you get your timing mails right when lining up the crank and cam A
- By George Garofallou
- Member of Leyland P76 Owners Club WA Oct Westwords 2002
|